Counter Extraction Script
This section is part of the “add-on” scripts for protograf. For background and general information, see the overview.
Purpose
Extraction of individual rectangular counter images, as might be found on a scan of a full set of counters on a wargame’s countersheet — typically an A4 or Letter-sized card — is useful to provide images to programs such as VASSAL
Usage
To use this script, you open a terminal and “run” it with Python in a similar way that you do for a PG script — see Run a file with Python — as follows:
python -m protograf.scripts.counter_extraction
The script requires a configuration file to work properly; if this is called
anything except config.ini, you will need to pass in the file name to the
script as follows:
python -m protograf.scripts.counter_extraction myfilename.ini
Configuration
The configuration for the script should be stored in a plain text file; you can use the same kind of editor that you use for protograf scripts.
An example of the contents of such a file is shown below:
[file]
name=test.jpg
output=/tmp/pb

[counter]
width=120
height=120
top=24
left=33
gap_x=5
gap_y=5
prefix=pb_var

[group]
sets=1x3
cols=8
rows=2
gap_col=0
gap_row=28

[frame]
thickness=2
color=black
alias=1
There are four sections in the file, identifed by the [name] format, and
each section contains one or more settings, in the format name=value.
By changing these values, the script behaves in different ways.
The script does provide default values for these, but its best to set your own to ensure the output is correct!
File section
This section contains the settings for input and output:
name: this is name of the countersheet file; if it is located outside of the directory from whcih the script is being run; the full and absolute path to that directory must be supplied as well
output: this is the name of the directory in which the counter images must be stored
Counter section
This section contains the settings for individual counters:
width: this is the width in pixels of the portion of the counter that must be extracted
height: this is the height in pixels of the portion of the counter that must be extracted
top: this is the distance in pixels from the top of the countersheet image to the top-edge of the top-left counter in it
left: this is the distance in pixels from the left of the countersheet image to the left-edge of the top-left counter in it
gap_x: this is the gap “across” between the right edge of the portion of the counter that must be extracted and the left edge of the portion of the next adjacent counter that must be extracted
gap_y: this is the gap “down” between the lower edge of the portion of the counter that must be extracted and the top edge of the portion of the next adjacent counter that must be extracted
prefix: this is text that must be added to each counter’s filename
Group section
This section contains the settings for the way that counters are “grouped” on a countersheet:
sets: this is the number of groups of counters “across” and “down”; so
2x3means two groups across, with three groups downcols: this is the number of counters in a group, going across the image
rows: this is the number of counters in a group, going down the image
gap_col: this is the distance in pixels between each group, going across the image
gap_row: this is the distance in pixels between each group, going down the image
Frame section
This section contains the settings for the appearance of an extra “frame” — a thick line added around the border of each counter image:
thickness: this is the width in pixels of the frame; it must be an even number - 2, 4, 6 etc. If it is
0then no frame is drawncolor: this is the color of the frame as a common name — such as
black,red,orange,green,blue,yellow— or a hexadecimal color code, such as#4B0082alias: setting this to a non-zero value, e.g.
1, will cause the image frame to be drawn with an aliasing effect
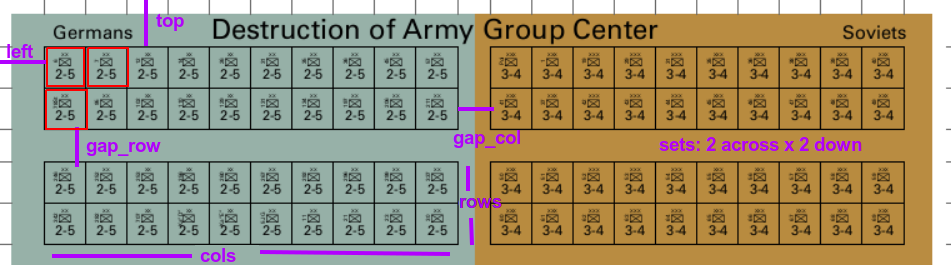
Example
An example of some of these settings can be seen in this image: