Customised Text
The descriptions here assume you are familiar with the concepts, terms and ideas for protograf as presented in the Basic Concepts — especially units, properties and defaults.
You should have already seen how default text can be created, in Core Shapes.
Overview
Adding text to a design is a very common practice.
protograf offers four similar, but differing, ways to this.
The first is through directly “embedding” the text as part of a shape. The Customised Shapes section has many examples showing how, for example, properties such as label_text or heading_text can be used to display text at predefined locations relative to where the shape is positioned. Such text has the advantage that it automatically “moves” when the shape is repositioned; but the styling options for such text are limited.
The other three ways make use of the Text() command as described below.
These ways require you to identify exactly where on a page (or card) the text
must appear. In the case of HTML-type text, many more styling options also
exist.
Properties
Basic Properties
The basic properties that can be set for Text() are:
text - the text string to be displayed
font_size - default is
12pointsfont_name - the default is
Helveticastroke - the default text color is
blackalign - the default horizontal alignment is
centre; it can be changed to beleftorrighttransform - convert the text to
upper(u) orlower(l) ortitle(t) case
Advanced Properties
The more advanced properties that can be set for “box” Text() are:
wrap - set to
Trueto enable the text to wraphtml - set to
Trueto both enable the text to wrap and also to use embedded HTML/CSS styling optionswidth - width of the box in which the text appears
height - height of the box in which the text appears
box_ - various properties, similar to the that of most areas, can be set to style the box in some way, including box_fill, box_stroke, box_stoke_width, box_dotted, box_dashed, and box_transparency
style - set HTML/CSS properties that will apply to all of the text; this will automatically also set the html property to
Truevalign - the default vertical alignment for text whose property is set to
wrapistop; it can be changed to bemiddleorbottom
Line of Text
Line text is the simplest type of text. It requires only an x and y position, plus the text itself, to be provided. It assumes that a single line of text is all that is required.
For example:
Text(x=3, y=1, text="This is default 12pt Helvetica")
Line text can make also use of the basic properties to set Font
attributes, and carry out transformation and alignment.
For example:
Text(x=4, y=0,
     font_size=6, stroke="red",
     font_name="Times-Roman",
     align="right",
     transform='t',  # titlecase!
     text="Red 6pt Times titlecase aligned right")
Note the the “alignment” is based on the x and y position; so right
aligned text will end on that position and left aligned text will
start on that position.
Wrapped Text Box
A wrapped text box is created by setting wrap=True in a Text() command.
A wrapped text box is very similar to the single line text, but in addition to the x and y position, it also requires height and width to be set.
The text is then “wrapped” within the boundaries of the rectangle defined by these settings.
For example:
Text(x=0, y=3,
     height=2, width=4,
     wrap="True",
     font_size=7, stroke="red",
     font_name="Courier",
     align="right",
     transform='t',  # titlecase!
     text="""Red 7pt Courier in title case aligned right
and wrapped around""")
In this example, it can be seen how use of triple quotes — “”” — enables the text to be written over multiple lines.
Important
If the box height and width are too small to allow all the text to be displayed, then NO text at all will be displayed!
HTML Text Box
An HTML text box is created by setting html=True in a Text() command.
An HTML text box is very similar to the single line text, but in addition to the x and y position, it also requires height and width to be set. The text is then “wrapped” within the boundaries of the rectangle defined by these settings.
Important
If the box height and width are too small to allow the text to be displayed using the given font family and size, then the text will be RESIZED to fit!
An HTML text box is most useful when fine-grained control of text is required.
An HTML text box is also required if you need to insert Unicode-referenced
characters as part of the text, using the \u0041 notation.
Hint
While it is possible to insert images into HTML text by use of the
<image> tag, be aware that this can cause the file size to
“balloon” quite dramatically — unless otherwise required rather
insert large, background images via the Image() command and restrict
the use of this tag to small icons and PNG files.
Knowledge of CSS, as used to style HTML web pages, is required if you to achieve specific effects. This can be done in two ways (neither is exclusive of the other):
the style property can be used to set style values for a
<div>that will “wrap” all of the text suppliedCSS styling and HTML elements can be used within the text itself; for example:
<p style="color:green">this is a green paragraph</p>.
Important
If you use font-family setting in the style property (and/or in the
text itself), you must have already activated that font via the
Font() command; for example Font("Eagle Lake").
Examples
To make it easier to see where and how text has been drawn, most of these examples have been created with a background grid (which protograf refers to as a Blueprint shape) added to the page — a small A8 “business card” size — for cross-reference. In addition, the default line width (aka stroke_width) has been made thicker for easier viewing of the small PNG images that are generated from the original PDF output.
A number of examples also use the Common command — this allows shared properties to be defined once and then used by any number of shapes.
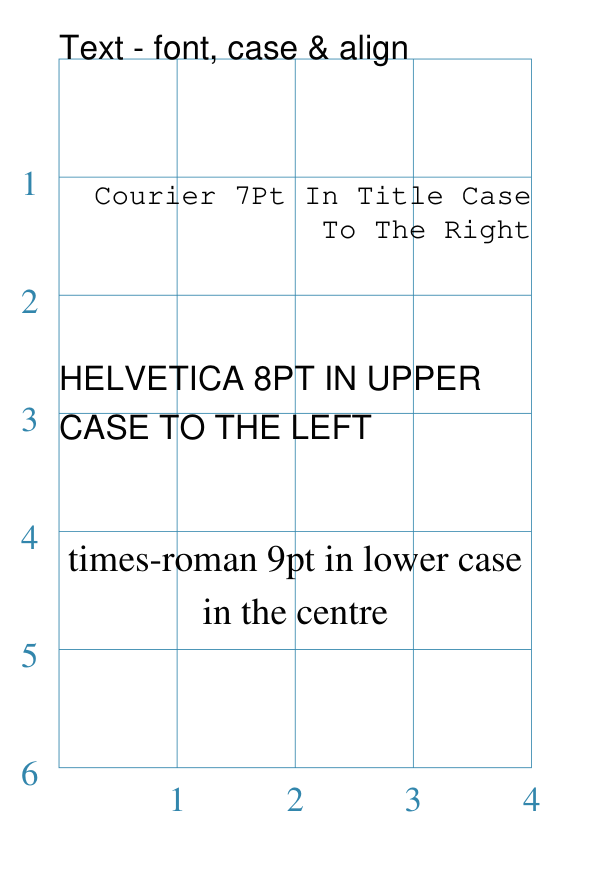
Example 1. Customised Text
|
This example shows the text constructed using various properties: Text(wrap=True,
x=0, y=1, width=4, height=1,
font_size=7, fill="black", stroke="black",
font_name="Courier", align="right",
transform='t',
text="Courier 7pt in title case to the right")
Text(wrap=True,
x=0, y=2.5, width=4, height=1,
font_size=8, fill="black", stroke="black",
font_name="Helvetica", align="left",
transform='upper',
text="Helvetica 8pt in upper case to the left")
Text(wrap=True,
x=0, y=4, width=4, height=1,
font_size=9, fill="black", stroke="black",
font_name="Times-Roman", align="centre",
transform='lowercase',
text="Times-Roman 9pt in lower case in the centre")
In this example, the use of Complex text can have the following properties:
The box must be big enough to show the text, otherwise none will be displayed! This example also shows how the text’s font can be set using the Note If you’re not using a built-in font, you must activate it first
with a For more details see the Font command. |
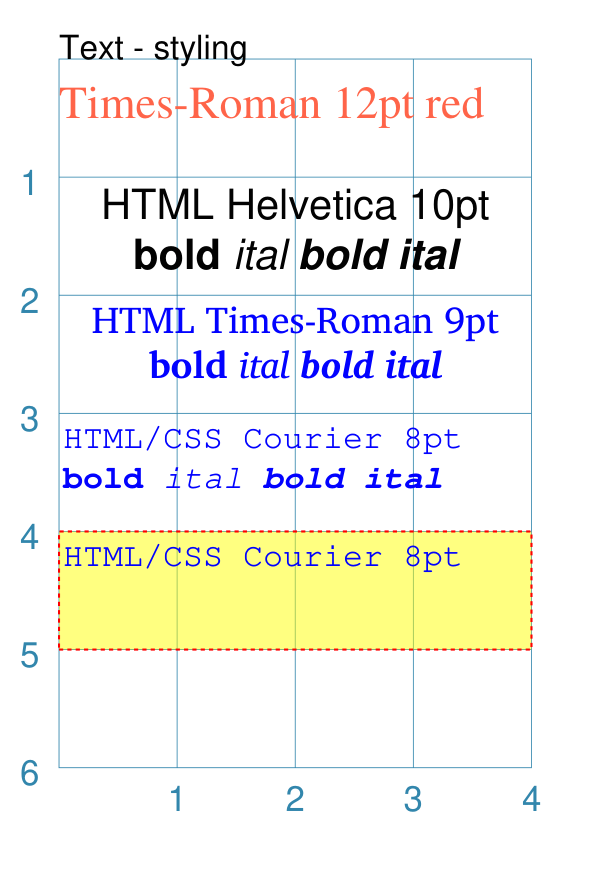
Example 2. HTML-Styled Text
|
This example shows the text constructed using various properties: Font("Times-Roman", size=11, stroke="tomato")
Text(x=0, y=0.5, align="left",
text="Times-Roman 12pt red")
Text(html=True,
x=0, y=1, width=4, height=2,
text='<span style="font-family: Helvetica; '
'font-size: 10pt; color: red">'
'HTML Helvetica 10pt<br/>'
'<b>bold</b> <i>ital</i> <b><i>bold ital</i></b></span>'
)
Text(html=True,
x=0, y=2, width=4, height=2,
text='<span style="font-family: Times-Roman; '
' font-size: 9pt; color: blue">'
'HTML Times-Roman 9pt<br/>'
'<b>bold</b> <i>ital</i> <b><i>bold ital</i></b></span>'
)
Text(x=0, y=3, width=4, height=2,
style="font-family: Courier; font-size: 8pt; color: blue;",
text='HTML/CSS Courier 8pt<br/>'
'<b>bold</b> <i>ital</i> <b><i>bold ital</i></b>'
)
Text(x=0, y=4, width=4, height=1,
box_stroke="red", box_fill="yellow",
box_dotted=True, box_transparency=50,
style="font-family: Courier; font-size: 8pt; color: blue;",
text='HTML/CSS Courier 8pt<br/>')
In this example, the use of “Styled” means that various CSS styling properties can be applied to it. This example shows how the text’s font can be set either:
The last HTML text shows how the rectangular “block” that forms the text boundary can itself be styled by using the various box_ properties. |
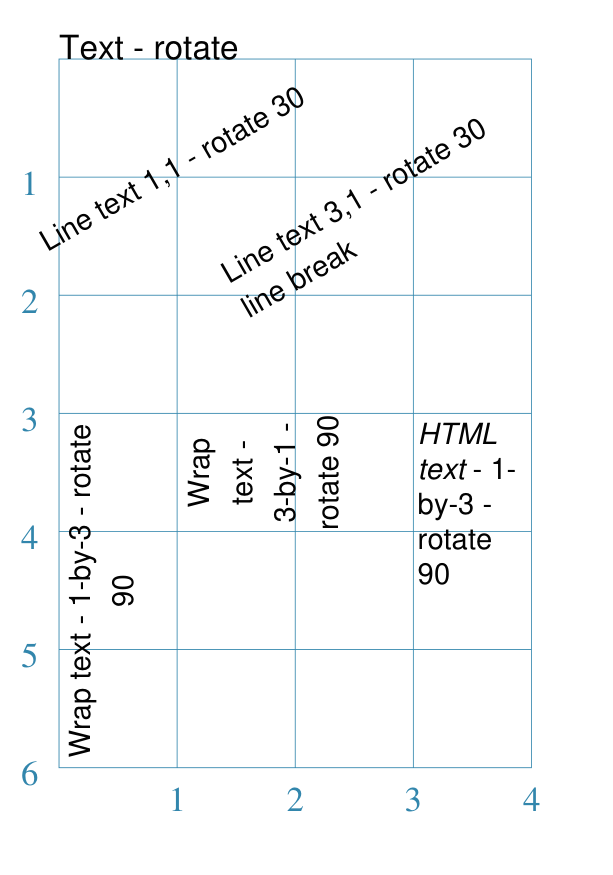
Example 3. Rotated Text
|
This example shows Text constructed using various properties. Note the use of the Common command for when multiple Texts all need to share the same properties. props = Common(
font_size=7, fill="black", stroke="black",
font_name="Helvetica")
Text(
common=props, x=1, y=1,
text="Line text 1,1 - rotate 30",
rotation=30)
Text(
common=props, x=3, y=1,
text="Line text 3,1 - rotate 30\nline break",
rotation=30)
Text(
common=props, x=0, y=3,
width=1, height=3, wrap=True,
text="Wrap text - 1-by-3 - rotate 90",
rotation=90)
Text(
common=props, x=1, y=3,
width=3, height=1, wrap=True,
text="Wrap text - 3-by-1 - rotate 90",
rotation=90)
Text(
common=props, x=3, y=3,
width=1, height=3, html=True,
style="font-family: Helvetica; font-size: 7pt;",
text="<i>HTML text</i> - 1-by-3 - rotate 90",
rotation=90)
This example shows how the text can be rotated using the rotation property. The top two examples show normal (aka “line”) text rotated around
the mind-point of the text at the Be aware that even though the The lower two examples on the left show “text in a box” using the
It should be noted that the width of the box is effectively also rotated, so that the width now becomes the “height” (and vice-versa of course). The lower example on the right shows “text in a box” using the
For this example, styling is via the style property and not via the Common command Important Both wrap and html text can only be rotated in increments of 90 (ninety) degrees!! |
Example 4. Wrap-styled Text
|
This example shows the text constructed using various properties: basic = Common(
wrap=True,
width=5, height=1.5,
font_size=10,
stroke="black",
font_name="Helvetica",
align="left")
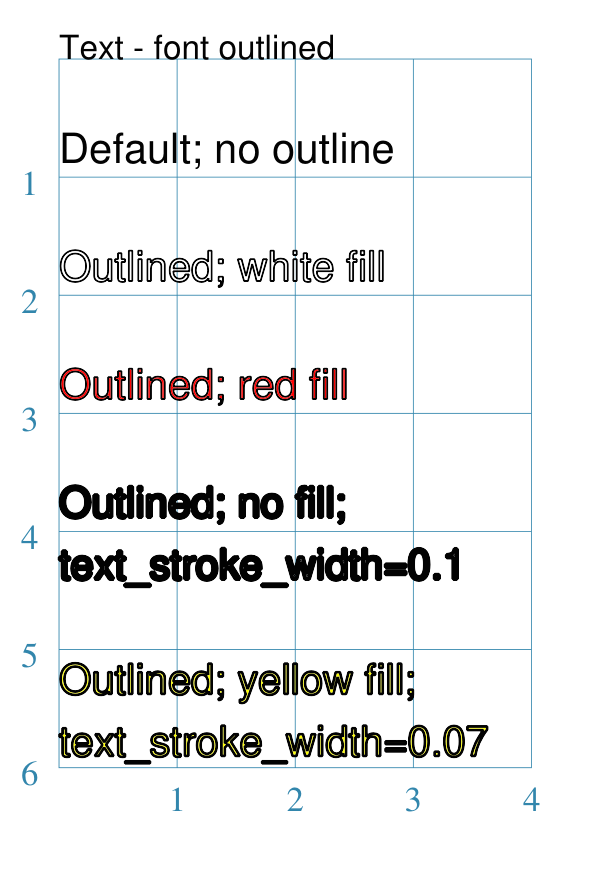
Text(common=basic,
x=0, y=0.5,
fill="white",
text="Default; no outline")
Text(common=basic,
x=0, y=1.5,
fill="white",
outlined=True,
text="Outlined; white fill")
Text(common=basic,
x=0, y=2.5,
fill="red",
outlined=True,
text="Outlined; red fill")
Text(common=basic,
x=0, y=3.5,
fill=None,
outlined=True,
text_stroke_width=0.1,
text="Outlined; no fill; text_stroke_width=0.1")
Text(common=basic,
x=0, y=5,
fill="yellow",
outlined=True,
text_stroke_width=0.07,
text="Outlined; yellow fill; text_stroke_width=0.07")
This example shows how the text can be styled using the outlined property. The first example shows what the text, with given font, size and color, looks like without any styling applied. The other examples show how the outlined property, when set to
Depending on what value is set for the fill property, the “inside” color of the text will be changed. The last two examples show the effect of setting the text_stroke_width,
which has a default of The fourth example shows how this effect can be used to simulate a “bold” styling for the text. |
Example 5. Wrap-Aligned Text
|
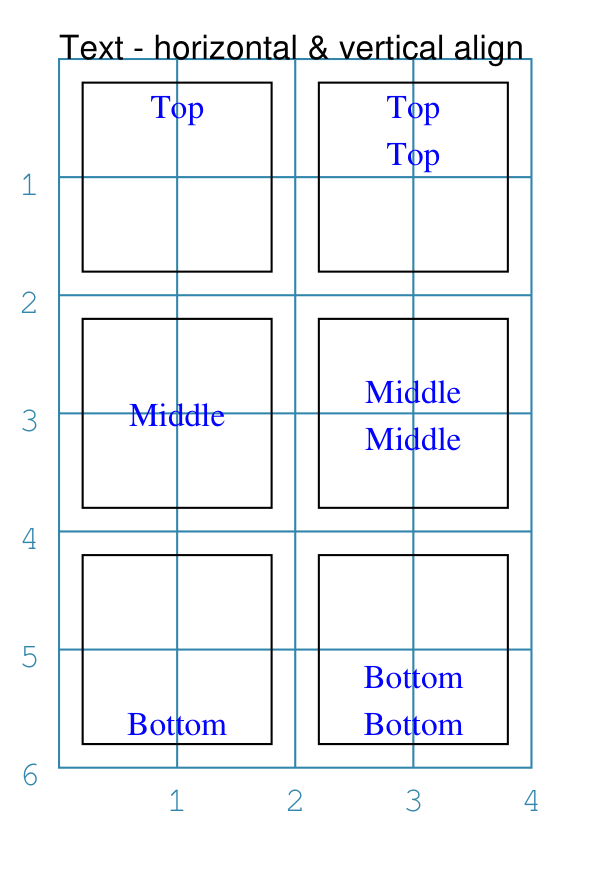
This example shows the text constructed using various properties: Font("Times-Roman")
tprops = Common(
wrap=True,
height=1.6, width=1.6,
font_size=8,
stroke="blue",
align="centre",
box_stroke="black"
)
Text("Top", common=tprops,
x=0.2, y=0.2,
valign="top")
Text("Top\nTop", common=tprops,
x=2.2, y=0.2,
valign="top")
Text("Middle", common=tprops,
x=0.2, y=2.2,
valign="middle")
Text("Middle\nMiddle", common=tprops,
x=2.2, y=2.2,
valign="middle")
Text("Bottom", common=tprops,
x=0.2, y=4.2,
valign="bottom")
Text("Bottom\nBottom", common=tprops,
x=2.2, y=4.2,
valign="bottom"
This example shows how the text can be styled using the valign property. All examples have a horizontal alignment of The top row examples show what the text looks like with a valign
of The middle row examples show what the text looks like with a valign
of The top row examples show what the text looks like with a valign
of |
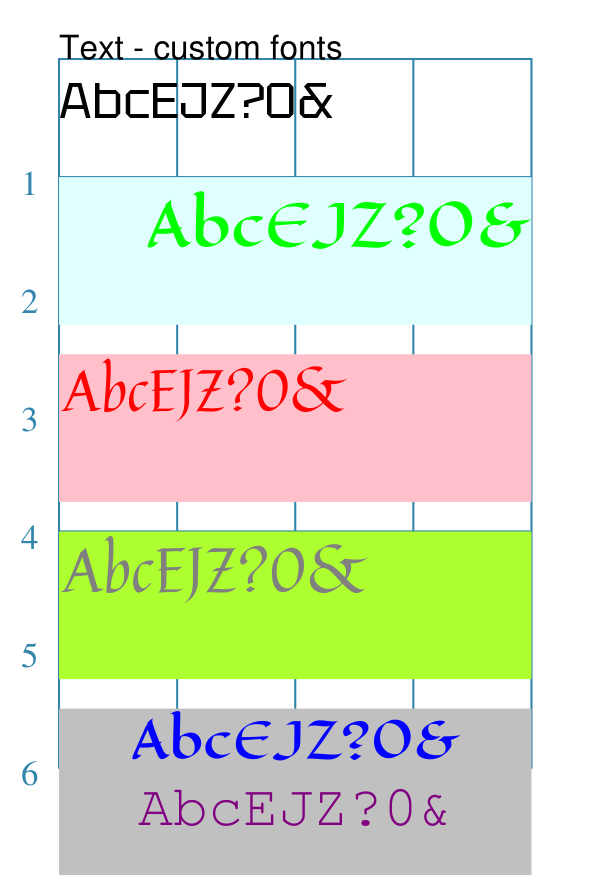
Example 6. Custom Fonts and Fallbacks
Many fonts, such as the ones shown in this example, are typically not installed by default on a machine. If you want to run this example as expected, then the fonts used can be obtained from:
The best way to use custom fonts in a script is to “activate” them with the
Font() command, as shown in the example near the start of the script.
Important
If you have previously run a script, then all fonts available at that time
would have been indexed. If you later install new fonts you want to use,
then you need to add in the cached_fonts=False property to the
Create() command at the start of the script. You only need to do this
once after a new font is installed, and then the property can be removed.
Fallbacks
If a custom font is not found when the script is run, then
protograf will “fallback” to using the default font of
Helvetica, which is guaranteed to be available for any PDF document.
However, you can provide your own alternatives for the fallback. Use
the syntax of a list of font names (inside a pair of [..``]`` brackets).
These will be used in the order given; for example, if the first font is
not found, then the second is used, as so on:
font_name=["Superior Font", "Arial", "Helvetica"]
|
This example shows the text constructed using various properties: Font("Quintessential")
Font("Eagle Lake")
Font("Tektur")
Font("FreeMono")
Text(x=0, y=0.5, width=4, height=1.5,
align="left",
font_name=["Tektur", "Arial"],
text="AbcEJZ?0&")
Text(x=0, y=1, width=4, height=1.25, wrap=True,
align="right", stroke="green", font_size=14,
font_name="Eagle Lake", box_fill="lightcyan",
text="AbcEJZ?0&")
Text(x=0, y=2.5, width=4, height=1.25, html=True,
align="left", stroke="red", font_size=14,
font_name="Quintessential", box_fill="pink",
text="AbcEJZ?0&")
Text(x=0, y=4, width=4, height=1.25,
box_fill="greenyellow", # NO html!
style="""
font-family: FreeMono;
font-size: 15.0px;
color:gray;
font-weight: bold;""",
text="AbcEJZ?0&")
Text(x=0, y=5.5, width=4, height=2.5,
html=True, box_fill="silver",
text="""
<div style="
font-family: Eagle Lake;
font-size:12.0px;
color:blue;
text-align:center;">
AbcEJZ?0&
</div>
<div style="
font-family: FreeMono;
font-size:14.0px;
color:purple;
text-align:center;">
AbcEJZ?0&
</div>"""
)
|