The Deck Command
This section assumes you are very familiar with the concepts, terms and ideas for protograf as presented in the Basic Concepts , that you understand all of the Additional Concepts and that you’ve created some basic scripts of your own using the Core Shapes.
It also assumes you have read through the section on card decks.
Overview
This command provides the overall “framework” for the cards that are defined in the script. It’s primary purpose is to set the card size, and then calculate how many cards appear on a page. It manages the “flow” of cards as they get drawn.
Primary Deck Properties
The following are key properties that will often need to be set for a
Deck:
cards - the number of cards appearing in the deck; it defaults to 9; note that other commands such as
Data()andMatrix()can alter this valueheight - the card height for a rectangular card it defaults to 8.89 cm, or 3.5”, i.e. the height of a Poker playing card
width - the card width for a rectangular card it defaults to 6.35 cm, or 2.5”, i.e. the width of a Poker playing card
Secondary Deck Properties
The following are other properties that can also be set for a Deck:
bleed_fill - set a background color for the page (up to the margins); if no separate fill property is set, then this color will be used instead
card_name - the name of a column in the dataset defined by the Data Command that specifies what file name will be given to the card when it is exported as an image (if not supplied, will default to using the page number and card number)
card_size - a pre-existing card size used to set width and height (values for width and height will override these); can be one of:
"poker","bridge","mini","miniamerican","minieuropean","skat","tarot"or"business"cols - the maximum number of card columns that should appear on a page
copy - the name of a column in the dataset defined by the Data Command that specifies how many copies of a card are needed
fill - sets the color of the card’s area; defaults to
whiteframe - the default card frame is a rectangle (or square, if the height and width match); but can be set to hexagon or circle
gallery - when set to a pair of numbers, e.g.
(9,6), will cause that many cards to be drawn on a page; the page size will be changed to fit them all; and all margins will be set to zero — an image created from such a page can be used as an input for programs such as Tabletop Simulator (TTS)grid_marks - if set to
True, will cause small marks to be drawn so that they align with the edges of the card framesgrid_marks_length - the length of the grid marks; defaults to
0.85cm (about one-third of an inch)grid_marks_stroke - the color of the grid marks; defaults to
graygrid_marks_stroke_width - the line width of the grid marks; defaults to
0.1grid_marks_style - set the location of where the grid marks are drawn; the default of
"edge"means they are drawn touching the border of the page, whereas"cross"means they are drawn at the corner of each card’s frame; it can be set to"both"if edge marks and crosses are needed. This property is only relevant for rectangular frame cards; other types default to “edge”` only.grouping - sets the number of cards to be drawn adjacent to each other before a blank space is added by the spacing property — use grouping_col and/or grouping_row to set spacing specifically for the horizontal (columns) or vertical (rows) direction respectively. Note that grouping does not apply to hexagon frame cards.
gutter - a value set for this helps determines the spacing between the fronts and backs of cards when these are drawn on two halves of the same page; its value is divided in half, and added to the top margin value, and each set of cards is drawn that distance away from the centre line of the page
gutter_stroke - if set, will cause a line of that color to be used for the gutter line; this defaults to
gray(to match grid marks)gutter_stroke_width - if set to a value, will cause a line of that thickness to be used for the gutter line
gutter_dotted - sets the style of the gutter line
gutter_layout - sets the orientation of the page for the cards drawn in the two gutter “halves”; this can be
portrait(the default) orlandscape`; the latter is useful when you have very tall cards e.g.tarotsized ones.mask - an expression which should evaluate to
TrueorFalse. This expression has the same kind of syntax as the T(emplate) command and it uses data available from the Deck’s Data Command). If the expression result isTruethen any matching cards will be masked i.e. ignored and not drawnradius - the radius for a frame of type hexagon or circle; it defaults to 2.54 cm (one inch)
rounding - sets the size of rounding on each corner of a rectangular frame card
rows - the maximum number of card rows that should appear on a page
spacing - create blank space between each card or grouping — use spacing_x and/or spacing_y to set spacing specifically for the horizontal or vertical direction respectively.
stroke - sets the color of the card’s border; defaults to
blackzones - a list that defines shapes that must appear on one or more pages
Hint
The one property that does not appear with the Deck() command is the
option to export the cards as individual PNG images. To this you need
to add cards=True to the Save() command.
Access to Deck Properties
If you assign the Deck to a name, you can use that name to access properties of the deck — including card attributes, such as the card size or the card centre — in the rest of your script.
Properties are accessed by means of a “dot”, as illustrated below.
dk = Deck(
    cards=4,
    height=3.2,
    width=2.2)

Circle(cx=dk.cx, cy=dk.cy)
Hexagon(cxy=dk.cxy)
Rectangle(height=dk.height, width=dk.width)
Here dk is the name assigned to the Deck; so properties are accessed by
dk, followed by a dot, then the name of the property.
In this code:
the
Circlewill have its centre at x of1.1and y of1.6;the
Hexagonwill also have its centre at x of1.1and y of1.6;the
Rectanglewill have its height and width equal to the size of the cards i.e. their height and width
Deck Property Examples
The examples show further usage of the Deck command, in addition to those provided in the Deck & Card Commands.
These examples are shown on a small A8-sized page, as the purpose is to illustrate how the Deck properties are used; normally cards would be set out on A4- or Letter-sized pages, but the principle will be the same.
In most cases — except where otherwise shown — a basic
Rectangle, with a thick rounded border, is used as the shape that is
drawn on each card. This purely for illustration purposes; your cards
would have their own set of one or more shapes that you would want to
draw on them.
Hint
When add elements to a Card, its always wise to leave a small gap between them and the edge of the card, to allow for possible errors when they are cut.
The Rectangle also has its label set to show the Card’s sequence
number i.e. the order in which it is drawn (usually top-to-bottom and
left-to-right), sometimes followed by its column and row number.
The part of the script for doing this is:
Card(
    '*',
    rectangle(
        x=0.2, y=0.2,
        width=1.7, height=2.8,
        stroke_width=1, rounding=0.2,
        label='{{sequence}}\n{{id}}')
)
In your script, the Deck() command should appear first before
any of the Card() commands.
Hint
Remember that any number of Card() commands, each drawing one or
more shapes on one or more cards, can be used in a script!
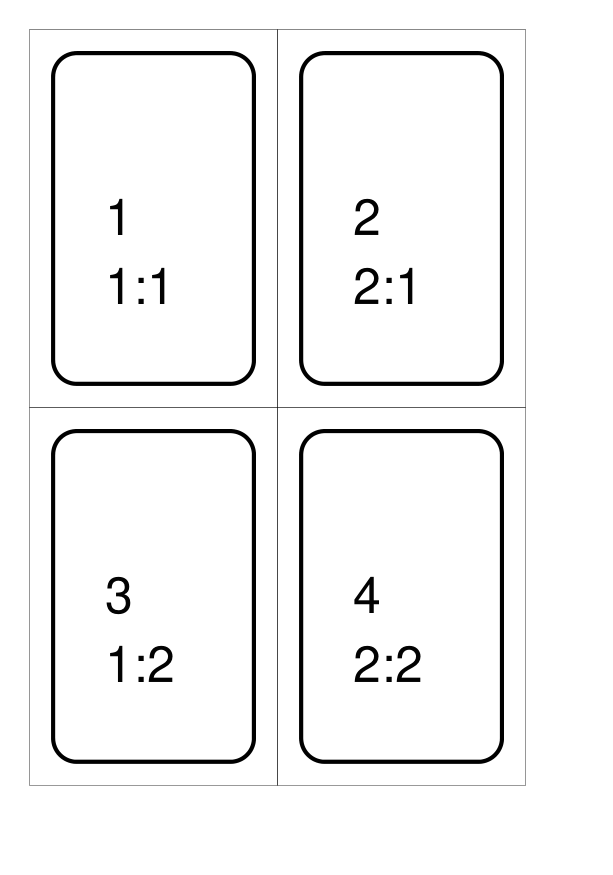
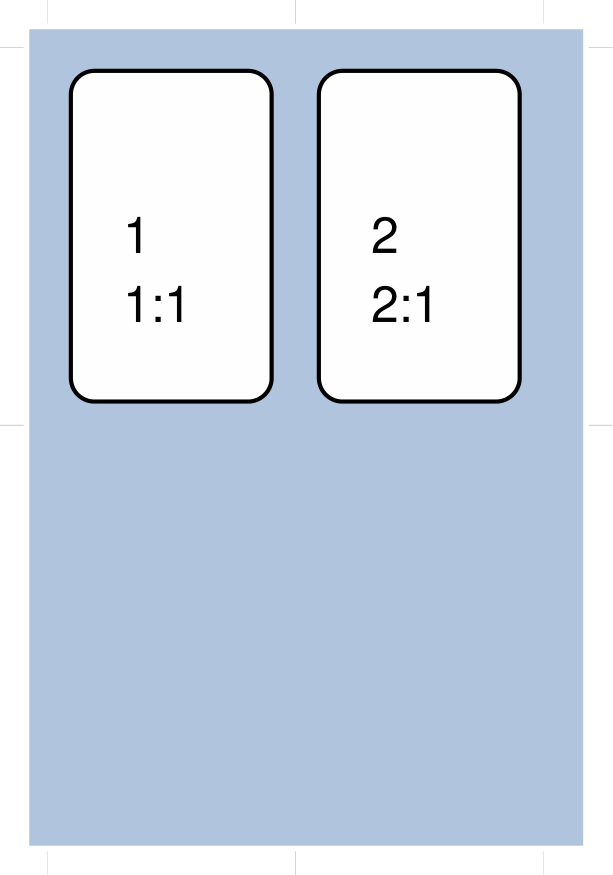
Example 1. Changing Defaults
|
This example shows the definition of a deck for a set of small cards. The card size means that there will be 4 rectangular cards on each A8 page: Deck(
cards=4,
height=3.2,
width=2.1)
Here the default for number of cards ( The frame for each card is shown by default as a thin black line. The shape, or shapes drawn on a card are located within that frame, relative to its boundaries. |
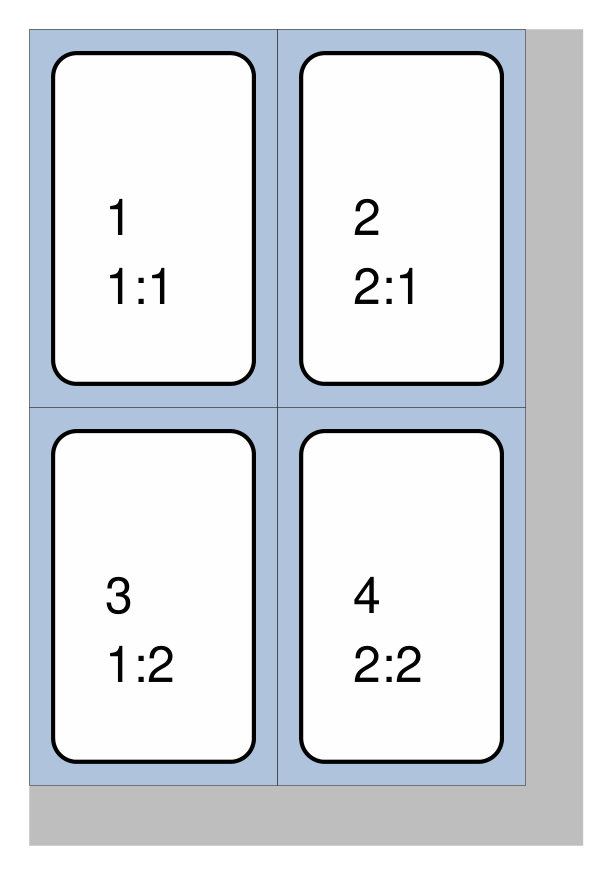
Example 2. Full Bleed
|
This example shows the definition of a deck for a set of small cards. The card size means that there will be 4 rectangular cards on each A8 page: Deck(
cards=4,
height=3.2,
width=2.1,
fill="lightsteelblue",
bleed_fill="gray")
The whole area occupised by the cards can be assigned a background color via the fill property of the Deck. This is sometimes known as a “bleed” area, and is useful in case where the cutting is misaligned; allowing the main area of the card to still be contain the required color. The bleed area for the cards can also be extended to the whole page (up to the margins) by using the bleed_fill color. In this example, the bleed_fill is shown as a different color from the fill, so it’s clear what its coverage is, but usually these colors would match. See also Example 5a. Grid Marks: Edge below. |
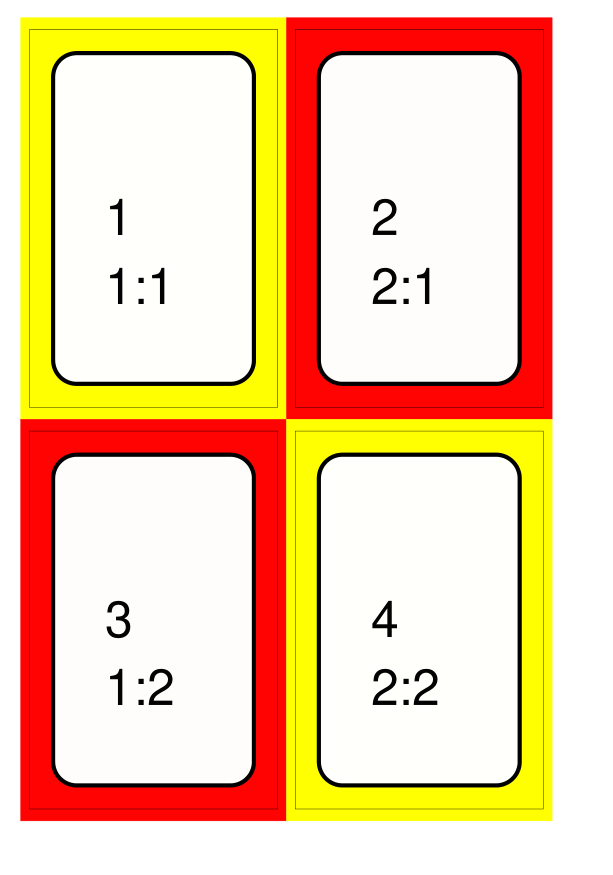
Example 3. Card Bleed
|
This example shows the definition of a deck for a set of small cards. The card size means that there will be 4 rectangular cards on each A8 page: Deck(
cards=4,
height=3.2,
width=2.1,
spacing_x=0.15,
spacing_y=0.2)
Card(
'1,4',
bleed_x=0.075, bleed_y=0.1,
bleed_fill="yellow")
Card(
'2,3',
bleed_x=0.075,
bleed_y=0.1,
bleed_fill="red")
Unlike Example 2. Full Bleed, there is no fill and bleed_fill
area set via the The
Note the use of spacing_x and spacing_y in the See also Example 6. Card Spacing below. |
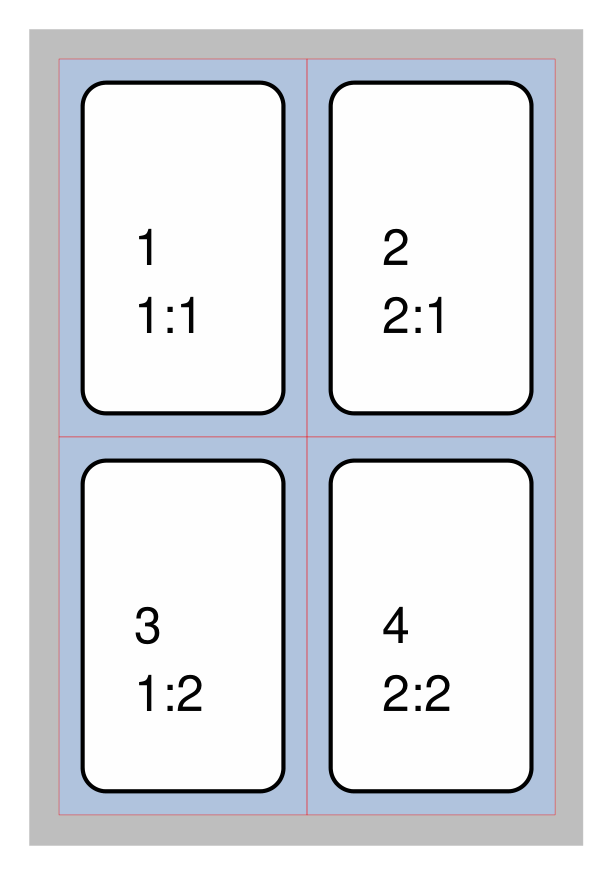
Example 4. Offset
|
This example shows the definition of a deck for a set of small cards. The card size means that there will be 4 rectangular cards on each A8 page: Deck(
cards=4,
height=3.2,
width=2.1,
stroke="red",
fill="silver",
bleed_fill="gray",
offset=0.25)
To allow for the possibility that a page may not printed all the way
to the margin, the printing area for the card frames can be offset
from the margin by any amount (in this example, by Its also possible to offset only from the left by using offset_x or only from the bottom by using offset_y. Note that in this example, the color of the Cards frame line has been changed to red; depending on the bleed_fill color it can be helpful to set this. |
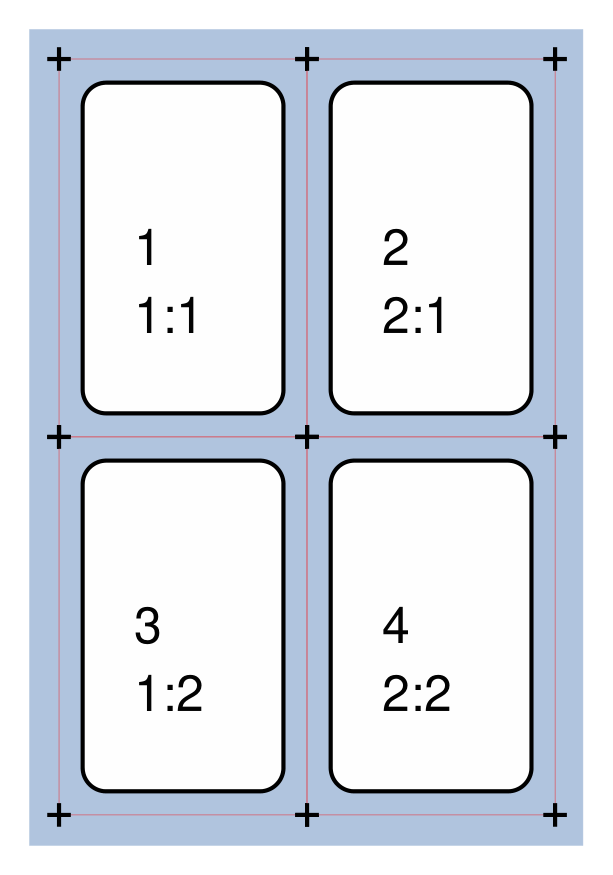
Example 5a. Grid Marks: Edge
|
This example shows the definition of a deck for a set of small cards. The card size means that there will be 4 rectangular cards on each A8 page: Deck(
cards=4,
height=3.2,
width=2.1,
stroke="red",
bleed_fill="silver",
offset=0.25,
grid_marks=True,
grid_marks_length=0.2,
grid_marks_stroke="black",
grid_marks_stroke_width=1)
In this example, there are two main changes from previous ones. There is now a consistent bleed color across both page background and within the cards themselves; if no separate fill property is used, then the fill color within the card frame will be set to match that of the bleed_fill. The edge of the page has small marks along it that are designed to help
with card cutting; Hint Be aware that the grid marks used to assist with cutting are being drawn at the page edge; depending on their length and your printer settings, this may result in them not being printed! In this example, the |

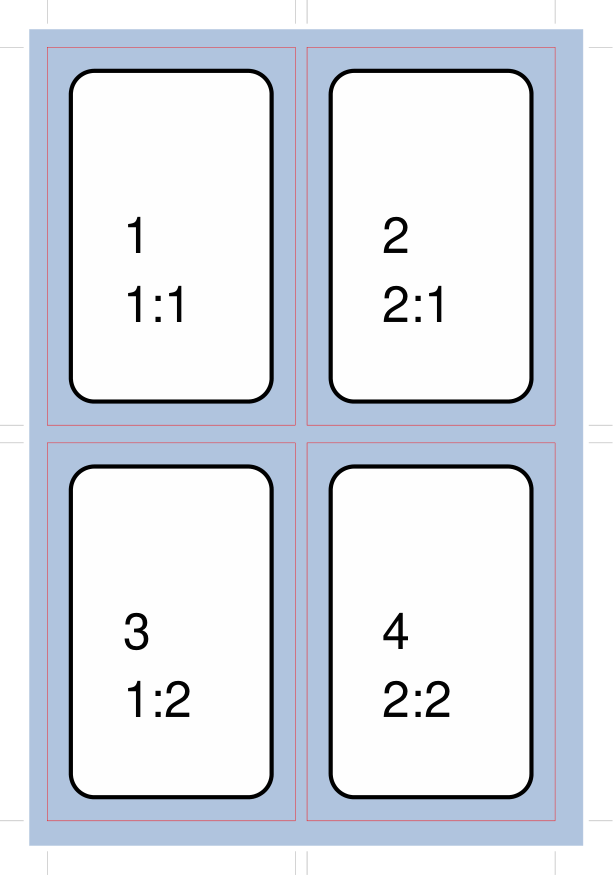
Example 5b. Grid Marks: Cross
|
This example shows the definition of a deck for a set of small cards. The card size means that there will be 4 rectangular cards on each A8 page: Deck(
cards=4,
height=3.2,
width=2.1,
stroke="red",
bleed_fill="silver",
offset=0.25,
grid_marks=True,
grid_marks_style="cross",
grid_marks_length=0.2,
grid_marks_stroke="black",
grid_marks_stroke_width=1)
This example is exactly the same as the one above, except for one change. The grid_marks_style is changed from the default value of Hint This style is perhaps suited to the case where cards are expected to be rounded, otherwise the marks might be drawn on the cards. The grid_marks_style can also be set to |
Example 6. Card Spacing
|
This example shows the definition of a deck for a set of small cards. The card size means that there will be 4 rectangular cards on each A8 page: Deck(
cards=4,
height=3.2,
width=2.1,
stroke="red",
bleed_fill="silver",
offset=0.15,
grid_marks=True,
grid_marks_length=0.2,
spacing_x=0.1,
spacing_y=0.15)
Depending on the printing and cutting requirements, it can be useful to add spacing (unused area) between the cards. The spacing property can sets spacing distance in both x- and y-directions. This example show spacing set for each direction separately — using spacing_x for horizontal spacing and spacing_y for vertical spacing. Note that using spacing also adds extra grid marks. Hint For simple “print, cut and use” cards, spacing is usually not needed as it just adds more work to the cutting step without much more value! |
Example 7. Clean Layout
|
This example shows the definition of a deck for a set of small cards. The card size means that there will be 4 rectangular cards on each A8 page: Deck(
cards=4,
height=3.2,
width=2.1,
stroke=None,
bleed_fill="silver",
offset=0.15,
grid_marks=True,
grid_marks_length=0.2,
spacing=0.15)
Here, all the other adjustments to the Deck layout — bleed_fill, offset, grid_marks and (possibly) spacing are as above. In this example, drawing of the Card frames is disabled by setting
The result is a “clean” layout where small mistakes in cutting will mean cards can still retain a fair visual appearance. |
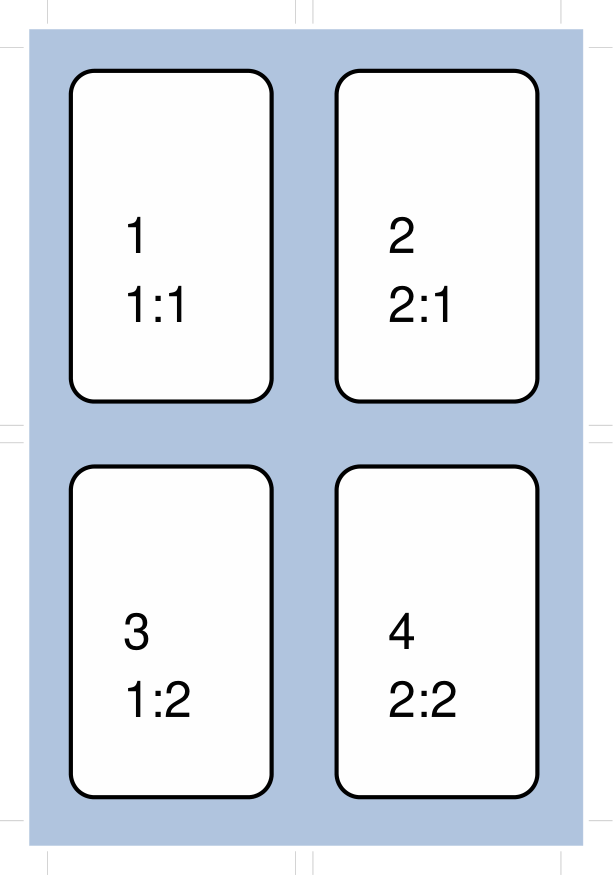
Example 8. Column Limit
|
This example shows the definition of a deck for a set of small cards. The card size means that there would normally be 4 rectangular cards on each A8 page; but use of cols changes this. Deck(
cards=4,
height=3.2,
width=2.1,
stroke=None,
bleed_fill="silver",
offset=0.15,
grid_marks=True,
grid_marks_length=0.2,
cols=1)
By default, protograf will fit as many cards as possible into the available page area. If for any reason, there needs to be fewer cards on a page, then setting the cols property will limit the creation of the number of columns on each one. |
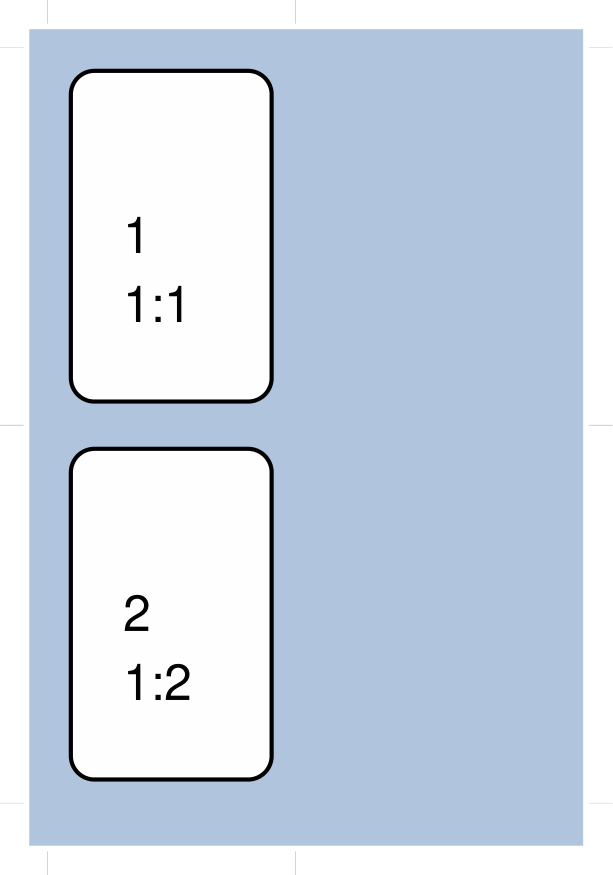
Example 9. Row Limit
|
This example shows the definition of a deck for a set of small cards. The card size means that there would normally be 4 rectangular cards on each A8 page; but use of rows changes this. Deck(
cards=4,
height=3.2,
width=2.1,
stroke=None,
bleed_fill="silver",
offset=0.15,
grid_marks=True,
grid_marks_length=0.2,
rows=1)
By default, protograf will fit as many cards as possible into the available page area. If for any reason, there needs to be fewer cards on a page, then setting the rows property will limit the creation of the number of rows on each one. |
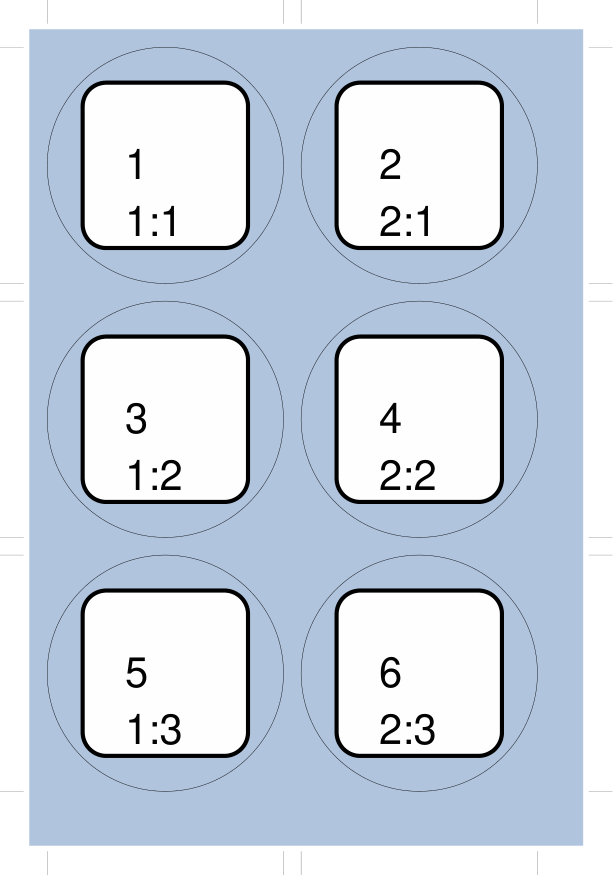
Example 10. Circular Frame
|
This example shows the definition of a deck for a set of small cards. The card size means that there will be 6 circular cards on each A8 page: Deck(
cards=6,
radius=1,
bleed_fill="silver",
offset=0.15,
grid_marks=True,
grid_marks_length=0.2,
spacing=0.15,
frame='circle')
The default frame for a Card is a rectangle, but this can be changed by setting the frame property to either circle or hexagon. In this example, because the cards are circular, the radius property needs to be set. The frame property also can be seen “in action” in various examples; see a hexagonal example and another circular example. |
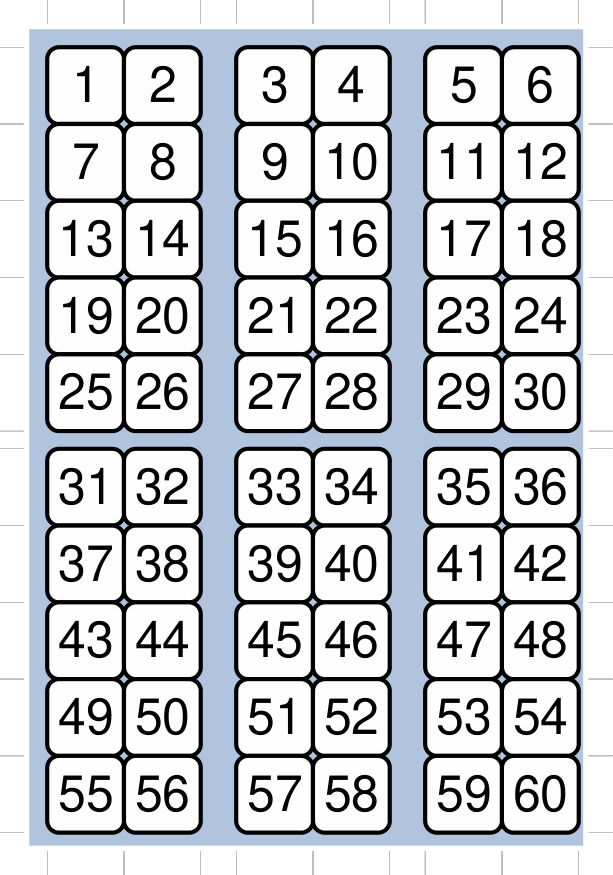
Example 11. Card Grouping
|
This example shows the definition of a deck for a set of very small cards — these are more likely to be game counters. The card size means that there will be 60 square cards on each A8 page: # design deck
Deck(
cards=60,
width=0.65,
height=0.65,
bleed_fill="silver",
offset=0.15,
grid_marks=True,
grid_marks_length=0.2,
spacing_x=0.3,
spacing_y=0.15,
grouping_cols=2,
grouping_rows=5,
stroke=None,
)
# design card
Card(
'*',
rectangle(
x=0, y=0,
width=0.65, height=0.65,
stroke_width=1, rounding=0.1,
label='{{sequence}}'),
)
By default, protograf will fit as many cards as possible into the available page area. This example shows how cards in the same grouping — whether in a row or column — are kept together, and how the spacing is inserted between each group rather than between each individual card. |
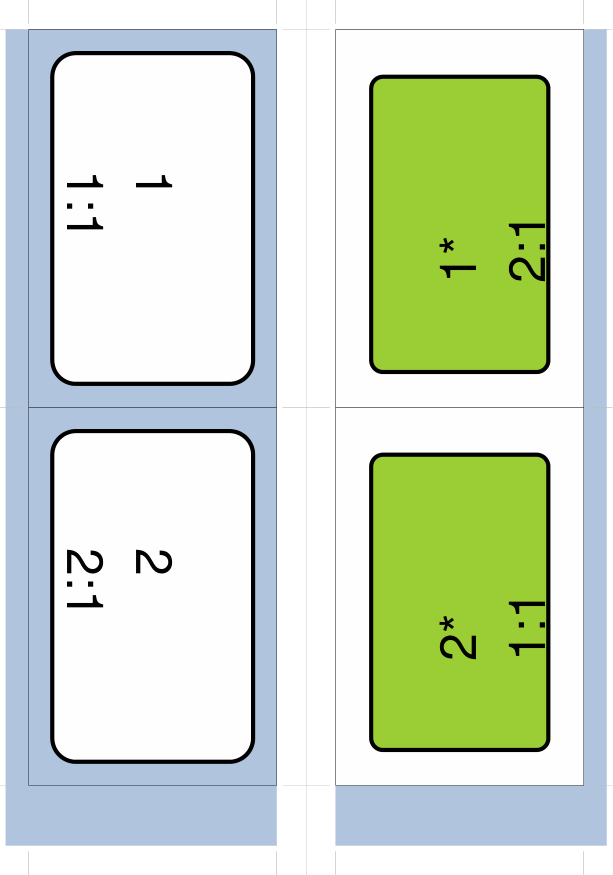
Example 12. CardBack and Gutter
|
This example shows the definition of a deck for a set of small cards. The card size means that there would normally be 4 rectangular cards on each A8 page; but the layout is changed to have a mix of normal Cards and CardBacks. In this case, the card backs are created with a green rectangle — but any type of technique used for graphics for the front of the card can also be used for the back. # design deck
Deck(
cards=4,
height=2.1,
width=3.2,
bleed_fill="lightsteelblue",
offset=0.15,
grid_marks=True,
grid_marks_length=0.2,
gutter=0.4
)
# design card
Card(
'*',
rectangle(
x=0.2, y=0.2,
width=2.8, height=1.7,
stroke_width=1, rounding=0.2,
label='{{sequence}}\n{{id}}'),
)
# design card back
CardBack(
'*',
rectangle(
x=0.3, y=0.3,
width=2.5, height=1.5,
stroke_width=1, rounding=0.1,
fill="yellowgreen",
label='{{sequence}}*\n{{id}}'),
)
The |
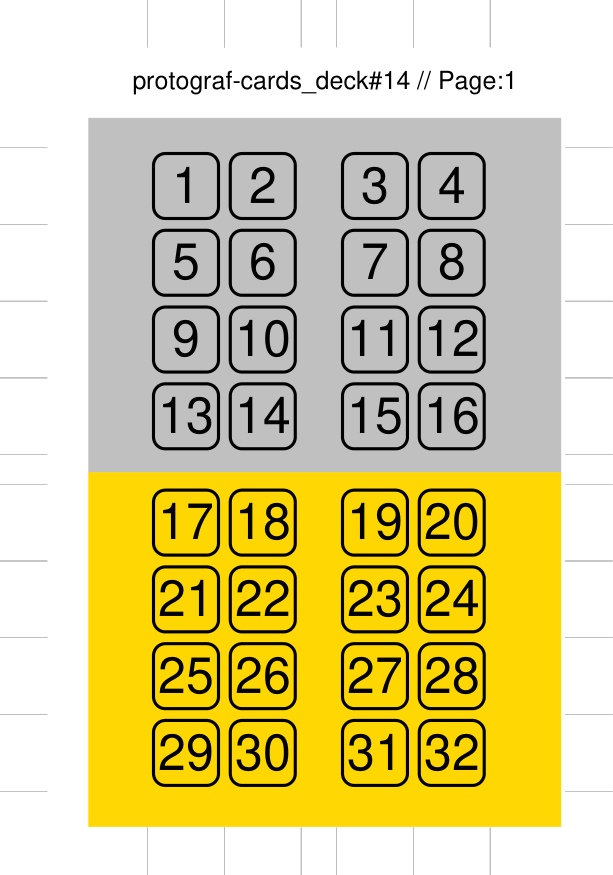
Example 13. Deck Zones
|
This example shows the definition of a deck for a set of very small cards — these are more likely to be game counters. The card size means that there will be 32 small square cards on each A8 page: # design deck
page_header = text(
text="protograf-cards // Page:{{page}}",
x=2.5, y=0.5, font_size=6, )
silver = rectangle(
x=0.5, y=0.75,
width=4, height=4,
fill_stroke="silver")
gold = rectangle(
x=0.5, y=3.75,
width=4, height=3,
fill_stroke="gold")
Deck(
cards=32,
width=0.65,
height=0.65,
offset=1,
grid_marks=True,
grid_marks_length=0.2,
spacing_x=0.3,
spacing_y=0.25,
grouping_cols=2,
grouping_rows=4,
stroke=None,
zones=[
('1', page_header),
('1', silver),
('1', gold)]
)
# design cards
Card(
'1-16',
rectangle(
x=0.05, y=0.05,
width=0.55, height=0.55,
stroke_width=0.75, rounding=0.1,
fill="silver",
label='{{sequence}}'),
)
Card(
'17-32',
rectangle(
x=0.05, y=0.05,
width=0.55, height=0.55,
stroke_width=0.75, rounding=0.1,
fill="gold",
label='{{sequence}}'),
)
This example is similar to Example 11. Card Grouping. The ..NOTE: Ensure that you do **not** set a page range for ``zones`` greater
than the actual number in your document; so a range of ``1-2``
will trigger an error here.
Each item in the list is a set of two values: the first is the page number — or range of page numbers — and the second is the shape to be drawn on the page(s); this is defined as usual for such a shape i.e. the x and y values are relative to the page margins and not those of the card. In this case, there is |
Example 14. Card Grid
|
This example shows the definition of a deck for a set of small cards. The card size means that there will be 4 rectangular cards on each A8 page: Deck(
cards=4,
height=3.2,
width=2.1,
card_grid=0.25)
# design card
Card(
'*',
rectangle(
x=0.2, y=0.2,
width=1.7, height=2.8,
stroke_width=1, rounding=0.2,
fill=None,
label='{{sequence}}\n{{id}}')
)
Here, the card_grid property for In this example, the fill of the Rectangle is disabled by setting
|
