Using Python Commands
This section assumes you are very familiar with the concepts, terms and ideas for protograf as presented in the Basic Concepts , that you understand all of the Additional Concepts and that you’ve created some basic scripts of your own using the Core Shapes.
Note
Note that if you already know the Python programming language, you can skip this section, unless you have any uncertainty about any of these topics!
Background
Working with an actual programming language, if you’re not a programmer, can be a little intimidating. Hopefully though, by the time you’ve started to look at this section, you will already be somewhat comfortable with writing and running protograf scripts and therefore already on your way to controlling a computer through a written language.
The concepts and methods represented here are relatively small increments to what you likely already know, but should give you more flexibility in terms of the way you can write scripts — without adding too much complexity. These are not essential but may be very useful.
Introduction
As you may already have worked out; the normal operation of the script is to start with the first command and then go on to the next one and so on until the last one has been carried out - this is the normal or “default” behaviour of any program.
However, most programming languages have the concept of loops and if statements. These commands are used to change the default behaviour of the program in some way. Similarly, functions are used in many languages to create a set of items that must all carried out together, and which need to be used/activated multiple times.
Any statement or functionality that is part of the Python programming language can be used in a script if you want to. The ones below are just to give you some idea of “the basics”.
Loops
A loop represents a section of your script that you want to repeat a certain number of times.
If you were reading a recipe, for example, it might say: Add a cup of flour and add an egg and mix; add another cup of flour and add another egg and mix; add a third cup of flour and a third egg and mix. So this is really the same set of actions that gets repeated three times. You could rephrase this in a different way. Repeat three times: Add a cup of flour, add an egg, and mix. The two parts of this statement represents what happens in a loop. The first part indicates how many times the loop happens, and the second part is the action, or set of actions, that need to be repeated.
In a Python, or protograf, script, a loop can be set-up by using the following kind of statement:
for number in range(1, 4):
    add_egg()
    add_flour()
    mix()
In this case the first line is the loop set-up:
the for indicates that we want to set-up a loop
the range part limits how many times the loop will happen by using a start and end value inside a pair of brackets — the 1 and 4 respectively
number stores how many times the loop has happened so far (for the very first time the value of number will be set to the start value of 1); this is referred to as the loop’s counter
The first line ends with : to show that it is expected that more lines
will follow that describe what must happen each time the program goes through
the loop.
The lines immediately following this set-up line are all the actions that must happen each time. These lines must all be indented 4 spaces and lined up below each other to show they are part of the loop. (Note: ignore the actual words used here; they are just to indicate the concept of actions… more practical examples are shown below!).
Once the action(s) have been carried out, the program goes back to the
line starting with the for — this is where the “loop” concept
comes from — to increase the number value and prepare to carry
out the action(s) again.
Note
When the loop counter’s value stored in number matches that of
the end value, the loop will stop right away and not process any
of the action(s) again.
In the case of protograf, a loop can be used to draw an item a number of times; for example:
for number in range(1, 4):
    Circle(x=1, y=number)
Here the value of y for the Circle will be set to a different number
every time the loop operates:
for the first time it will have a value of 1 (one);
for the second time a value of 2 (two); and
for the third time value of 3 (three).
As noted above, when number reaches the value of 4, the loop
ends right away. This loop will cause a Circle to be drawn in three
different y locations on the page but with the same x location.
You can combine the value of the number with other information to do more
complex kinds of operations. In this next example, the values for y
will be 0.5, 1.0 and 1.5 over the three iterations of the
loop - which is achieved by “halving” the value of the loop counter:
for y_location in range(1, 4):
    Circle(x=1, y=y_location * 0.5)
Note that we have used a different word in place of the usual number.
It does not matter too much which word you use; so just pick one that makes
most sense in terms of what you’re trying to achieve by using it.
The value of the loop counter normally goes up by 1 each time; but you can
set a third value, inside the brackets, for the range that is a
different increment number.
For example:
for number in range(1, 7, 2):
    Circle(x=1, y=number)
Here number takes on the values 1, then 3 and then 5; because
the third value of 2 is added to the loop counter each time the loop operates.
When the loop counter value stored in number reaches 7, then the loop
ends right away.
Multiple Loops
Multiple loops can be used to control different values. For example:
for y_location in range(1, 3):
   for x_location in range(1, 3):
        Circle(x=x_location, y=y_location)
Here the outer loop runs twice, setting values for both x and y.
The outer loop happens twice, and for each time it happens, the inner
loop happens twice. So there are actually four times i.e. 2 times 2
that the actions — in this case, drawing a Circle — are
carried out.
Python has a shortcut for handling multiple loops that you can use at your
discretion — its called zip (for more see
zip function).
If you wanted to draw a Circle at three locations, in three different
colors, you can store all of these in lists and then do the drawing in a loop.
For example:
x_pos = [1, 2, 3]
y_pos = [3, 2, 1]
fills = [red, green, yellow]
for x, y, fill in zip(x_pos, y_pos, fills):
    Circle(cx=x, cy=y, fill=fill)
If Statements
An if statement is a way to allow the computer to make choices
based on the information available to it.
All of us have to make choices. When we are driving a vehicle along a road and we approach a traffic light, we evaluate the color of the traffic light and make a decision; if the light is green we carry on driving, but if the light is red we come to a stop.
In a similar way we can set up a statement to allow the script to behave differently according to information that it has.
So an if statement will look something like this:
if color == green:
    keep_driving()
else:
    stop_driving()
You’ll see that there are really two parts to the if. The first part
is the condition that we are trying to evaluate - in this case what the
value of the color is - and the second part is the alternative which is
contained in the else.
As with the loop, a statement that ends with a : is followed by one
or more lines that are all indented below each other; these represent
the actions that are to be carried out in that part of the script.
The statement itself that forms part of the if, is termed a “true or
false” check. This means that it’s a comparison of some kind. In this
case, the script examines the value stored inside color and checks
if it is “equal to” — by using the double-equals sign — the
value of green. And because the script understands what is meant by
green it can carry out this comparison.
Should the comparison be dealing with two values that are equivalent
then the check is deemed to be correct or “true”, and so the actions
that are in the first part of the if are carried out - in this case
the keep driving action - and the rest will be ignored. However,
should the comparison be false, for example because the value stored in
color is red or orange, then the second part of the if statement
will be carried out - in this case the stop driving action.
An if statement can be used inside a loop, for example:
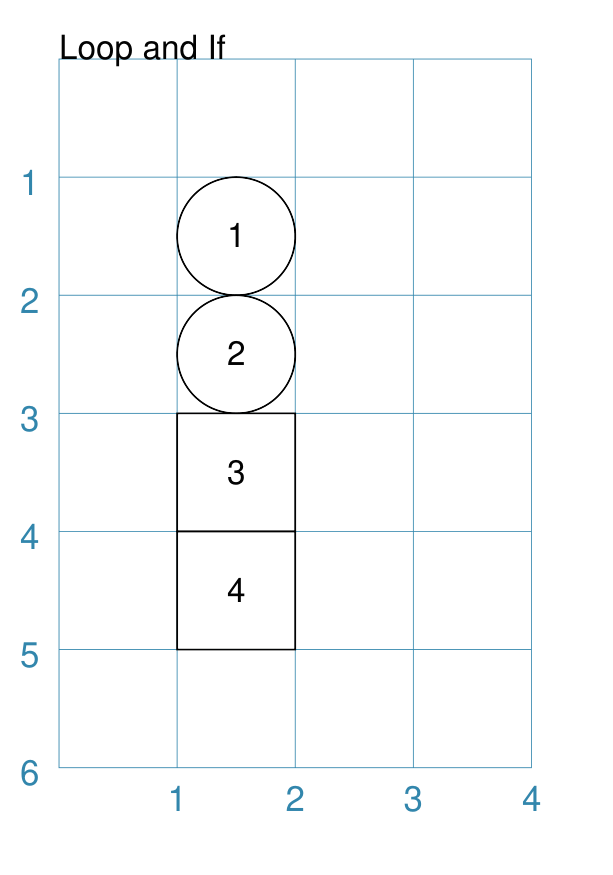
for number in range(1, 5):
    if number < 3:
        Circle(x=1, y=number)
    else:
        Rectangle(x=1, y=number)
Here, the script will either draw a Circle or a Rectangle depending
on the value of number: if its less than than 3 — the < comparison is
a “less than” check — then draw a Circle, otherwise if its 3 or more, then
draw a Rectangle.
This example is shown below.
|
An example of a loop and an if used together: Blueprint()
Text(common=txt, text="Loop and If")
for number in range(1, 5):
if number < 3:
Circle(x=1, y=number, label=number)
else:
Rectangle(x=1, y=number, label=number)
PageBreak()
The value of The value of |
Multi-part If Statements
An if statement can deal with multiple choices as well.
To continue with the driving example, we know there are three colors and
so the program must handle all of them. Any options after the first one
are handled with an elif prefix — short for “else if”:
if color == green:
    keep_driving()
elif color == orange:
    slow_down()
elif color == red:
    stop_driving()
else:
    pull_over()
In this example, the driver might be unsure what to do if the light has malfunctioned - best to be safe!
Functions
A function is the workhorse of a language. It allows you to define your “recipe” and then use that recipe multiple times with differing values for its properties.
Effectively, it allows you to create a mini protograf script inside your main script. As with loops, functions embed a set of steps to be carried out when they are activated, but functions are more powerful because they can allow control of the behaviour of any of the properties or commands that are part of them.
A function is simply created/defined by using a def command, followed by
the name you want to give the function — using a word with no spaces
in it — followed by a bracket-wrapped set of property names and their
default values — if any. These properties are only available as part of
the function, and represent aspects of that function that you need to be able
to change or process every time the function is activated.
The def line is followed by one or more lines that are all indented and
all aligned; these represent the actions that are to be carried out in that
functions; this can include drawing of shapes, but could also involve use of
loops and if statements.
When a function is defined, it is not activated; its only when you issue
a command for it — name() — that it will perform the actions
defined as part of it, and the script will carry on from the point where it
was activated.
Hint
When using functions in conjunction with
Cards, the function is referenced from
the card’s properties without the trailing (); this is
because the script activates the function on your behalf as and
when the card is drawn.
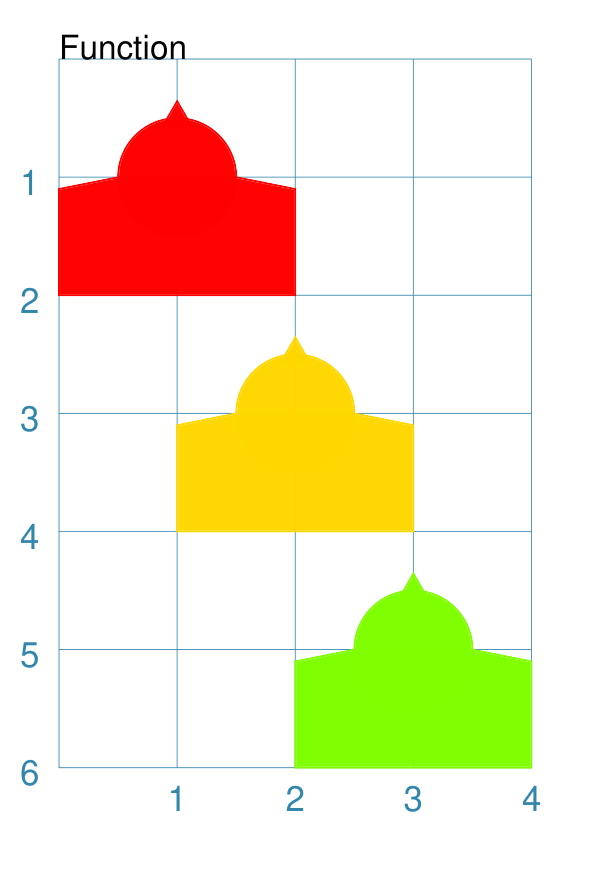
Function Example 1. Drawing Shapes
|
An example of a function: def capitol(a=0, b=0, c="red"):
Circle(
cx=a+1, cy=b+1, radius=0.5, fill_stroke=c)
Rectangle(
x=a, y=b, height=1, width=2, fill_stroke=c,
notch_y=0.1, notch_x=0.5,
notch_directions="nw ne",)
Triangle(
cx=a+1, cy=b+1.5, side=0.25, fill_stroke=c)
Create(paper="A8", margin=0.25)
Blueprint()
capitol() # uses default values
capitol(a=1, b=2, c="gold")
capitol(a=2, b=4, c="lime")
PageBreak()
Save()
The function named The values have defaults - If values are provided to a and b, these will change where the shapes are drawn; if a value is provided to c it will change the shape’s color. These changes to the function’s properties can be seen in the other uses made of it above; the shapes are drawn in different colors and different locations. The function is activated by simply including its name as part of the script, along with its brackets, such as in the line: capitol()
or, if setting custom values for the function’s properties: capitol(a=1, b=2, c="gold")
|
Function Example 2. Modifying Data
A function can also be used for a “non-drawing” operation, such as a calculation.
You can, for example, create one that generates or modifies the value of a property used by a shape.
The use of return is a key step for most functions; any time that it used,
the function will stop operating and “go back” to the main part of script. The
script will resume from the point where the function has just been activated.
def shift(a=0):
    return a + 1

Circle(cx=3, cy=3, diameter=shift())
Circle(cx=3, cy=3, diameter=shift(1))
Circle(cx=3, cy=3, diameter=shift(2))
Here the different circles each are assigned a slightly larger value
by the function simply adding 1 to them.
This is a trivial example, but it serves to show how functions can be added and used by your script.